前言
我从来都没有记笔记的习惯,从小学到现在,每次都是买个笔记本,坚持了一两个星期后就放弃了。
到了大学,我终于坚持下来记笔记了,但跟我所学习的专业并没有关系,是因为博客;Linux 是我自己摸索着学习的,用的时候属于需要什么就去查什么,它有很多命令是经常重复使用的,每次去查也太麻烦了,所以我就建了个文件夹,用记事本去记录。
算是被迫养成了记笔记的习惯
这样并不优雅,查看也并不方便,不过能用我也就没管那么多,这时我已经开始留意有没有好的笔记方案。
暑假的时候我发现了 wikijs 这个项目,它的 UI 挺不错的(装完就是图片这个样子,我的已经删了,之前没截图)
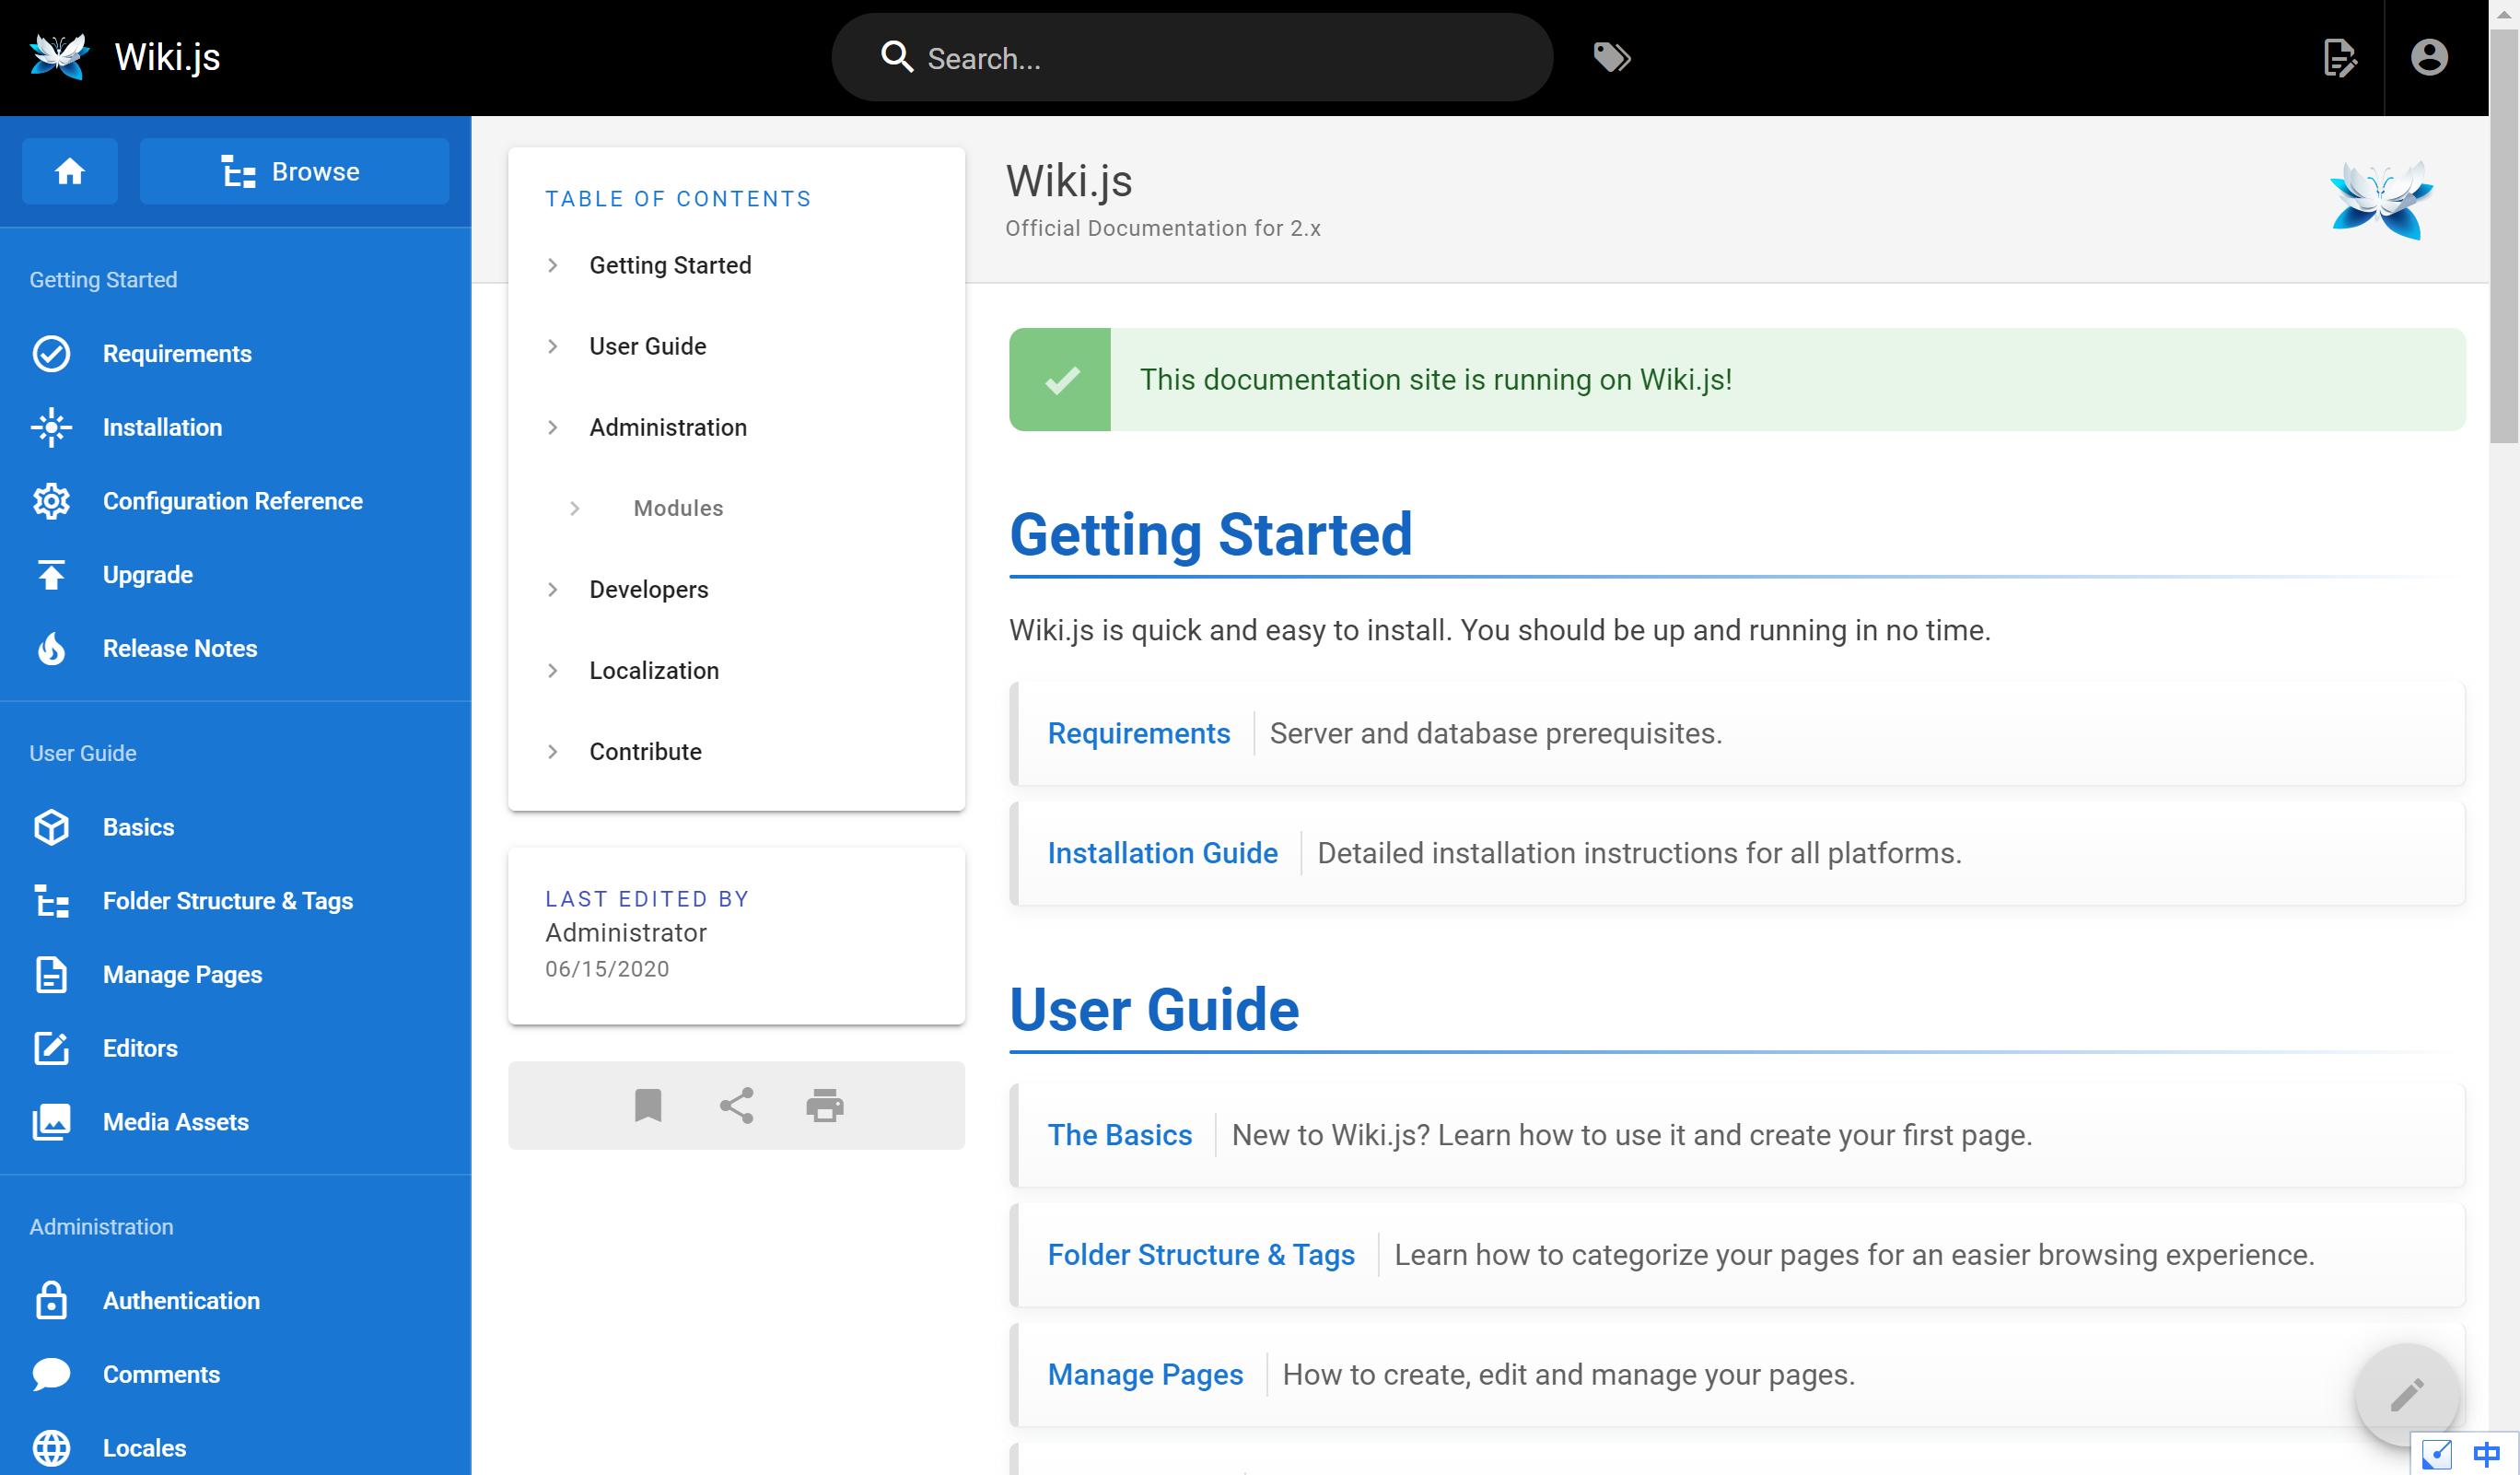
最重要的是他是以网站的形式呈现内容,这意味着记录的笔记在任何联网的设备上都可以查看,看到这里我已经心动了。
安装并不复杂,我迅速安装好了开始使用,首先我就把我之前记录的 Linux 笔记迁移到了上面,目前的 wikijs 支持 markdown 和 html,我使用的是 markdown ,编辑完成后,自带的标题跳转以及代码块显示都非常直观方便。
UI 也非常符合我的审美,在仔细查看设置选项后,我发现它还支持数学公式的显示,我的专业是自动化,有许多公式需要记录。
这个暑假我还挂科了,开学就要补考。
于是我决定用它来记笔记,试试效果。
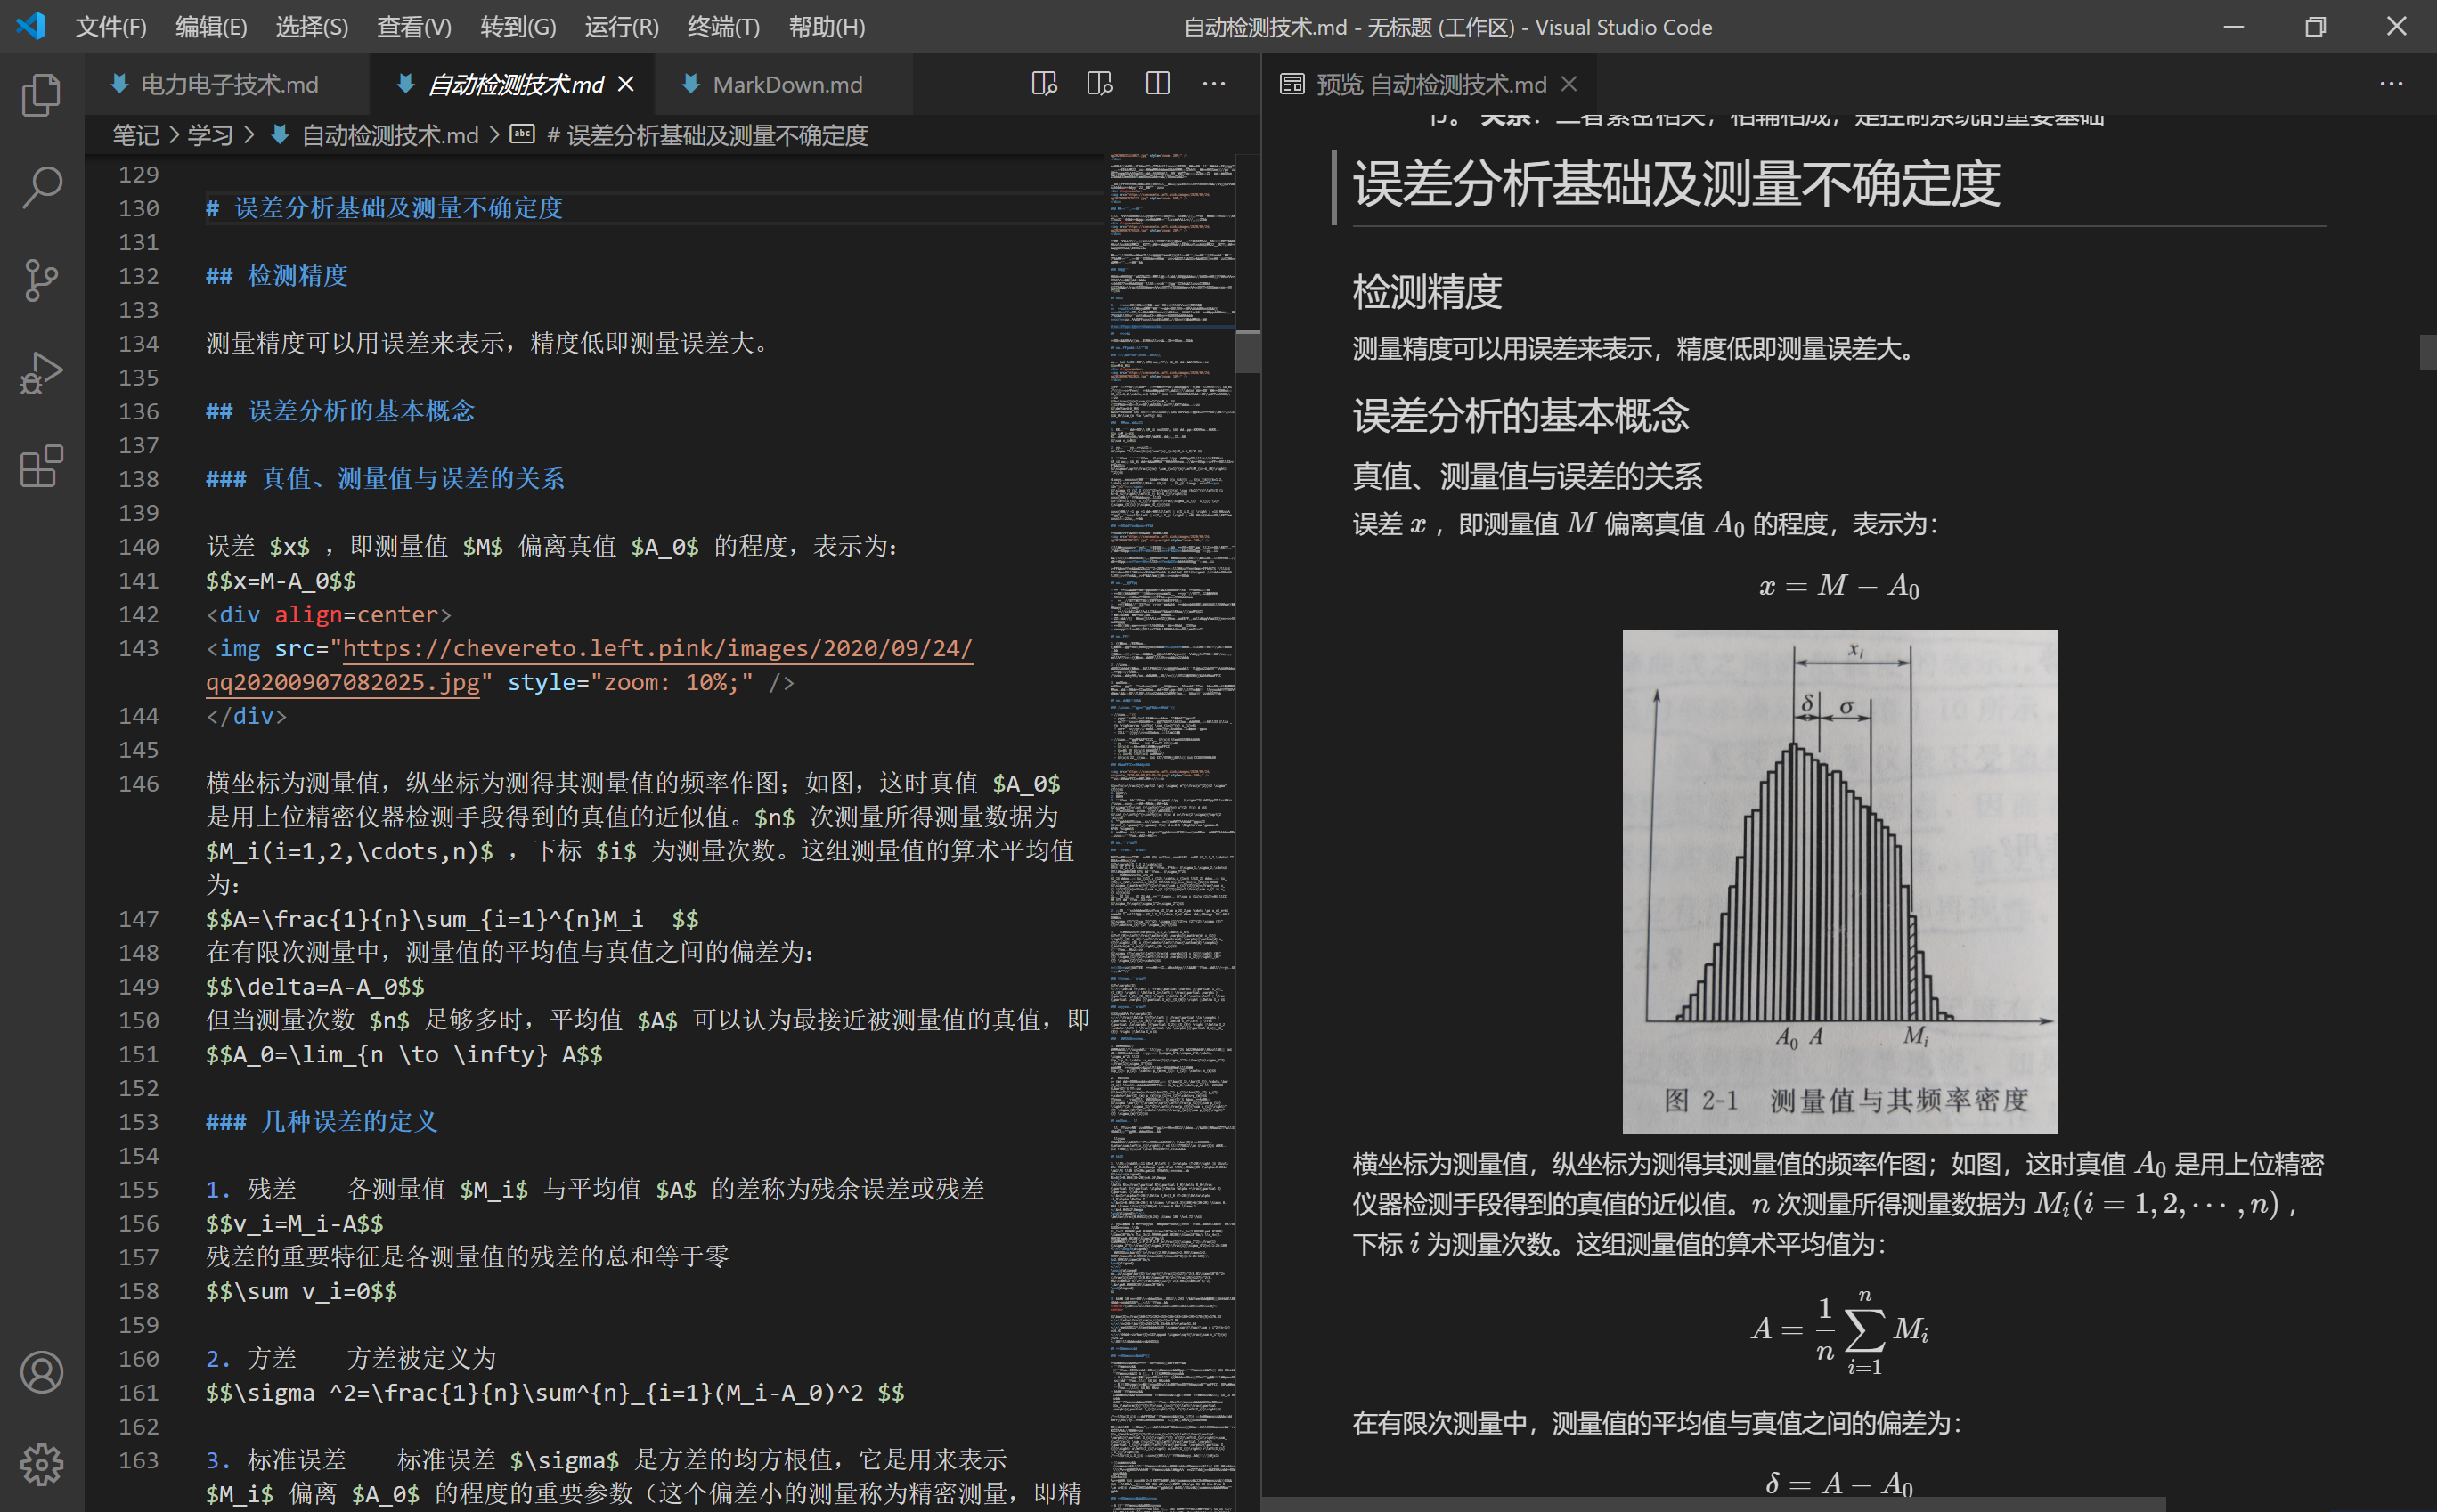
开始是非常舒服的,网站的编辑界面是“所见即所得”的样式,左侧代码区,右侧为渲染完成之后的样子,我很喜欢这个样式。
然而好景不长,几周后,我发现问题了:
- 文章目录仅显示一级和二级标题
- 个别数学公式渲染不符合标准
- 全局搜索基本没有(有用的需要依靠第三方,但要收钱)
- 随着数学公式的增多,编辑会逐渐变得卡顿
前几条我都还可以忍受,但最后一条我真的忍不了,后期真的太卡了,打一个字要卡一秒,真的无法忍受。
几天卡顿的编辑体验后,我忍无可忍,决定换一种方案。
方案
我的要求是这样的:
- 优秀的无卡顿编辑体验
- “所见即所得”的Markdown编辑
- 完整的数学公式支持
- 网站的展现形式,任何联网设备随时可查
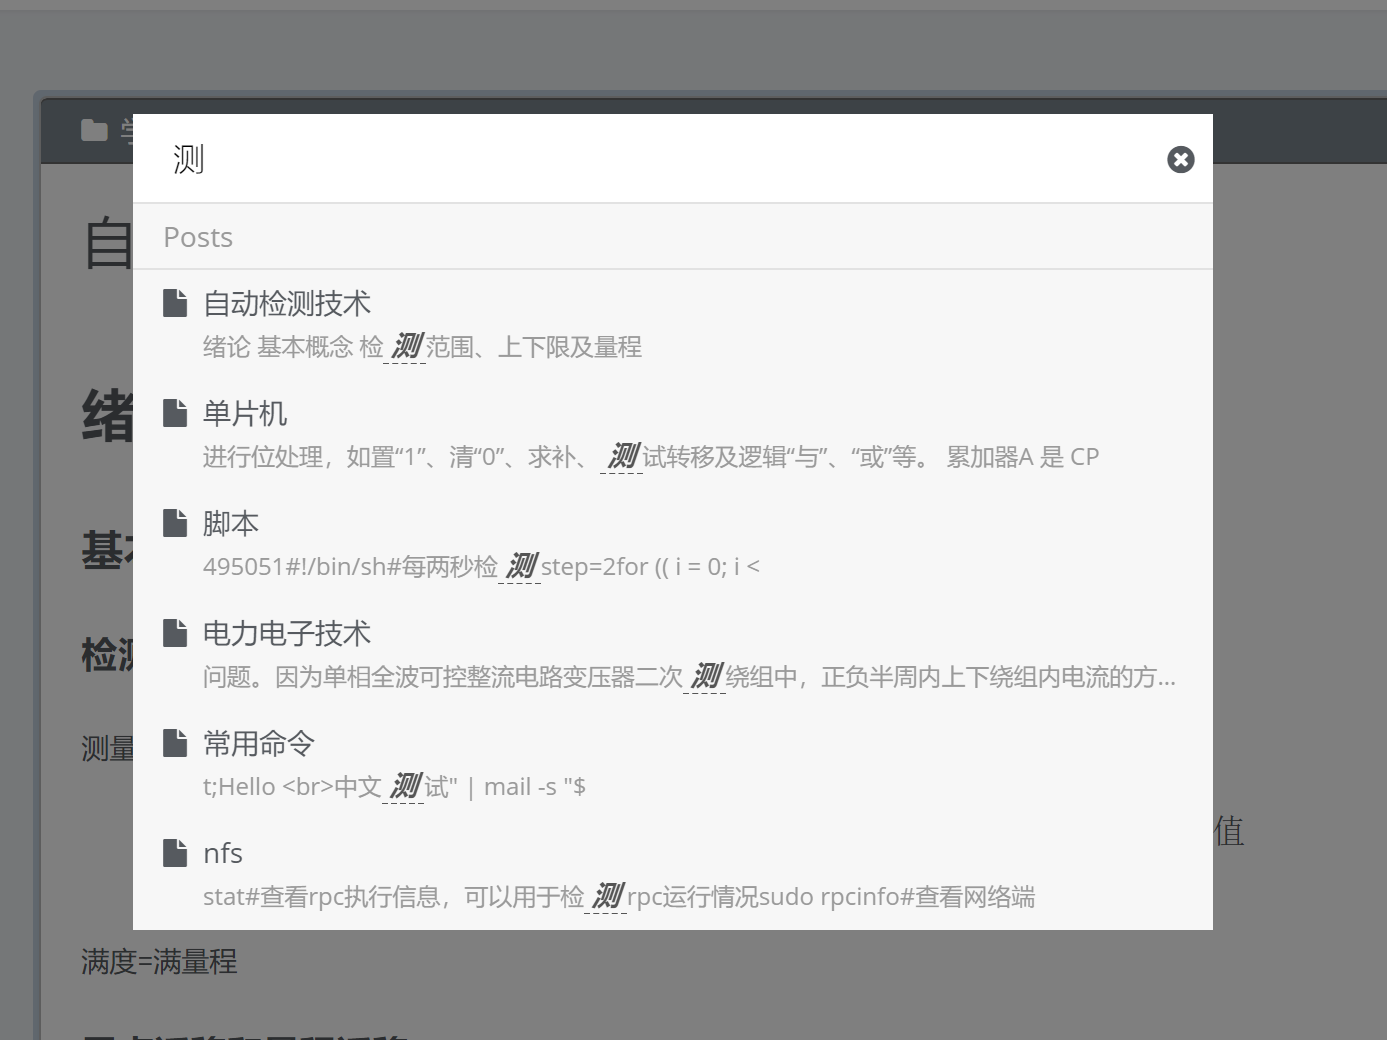
- 全局搜索
为了保证不卡顿且编辑体验优秀,最好就是在本地编辑,我选择了VScode加上Markdown插件(markdown-all-in-one),还有语法检查插件(markdownlint)
本地编辑的体验完美了,但同时也给网站显示带来了新的问题:
- 文件实时同步
- VScode编辑显示什么样子,网站也应该显示什么样子
经过一番研究,我选择了Hexo+Wikitten主题
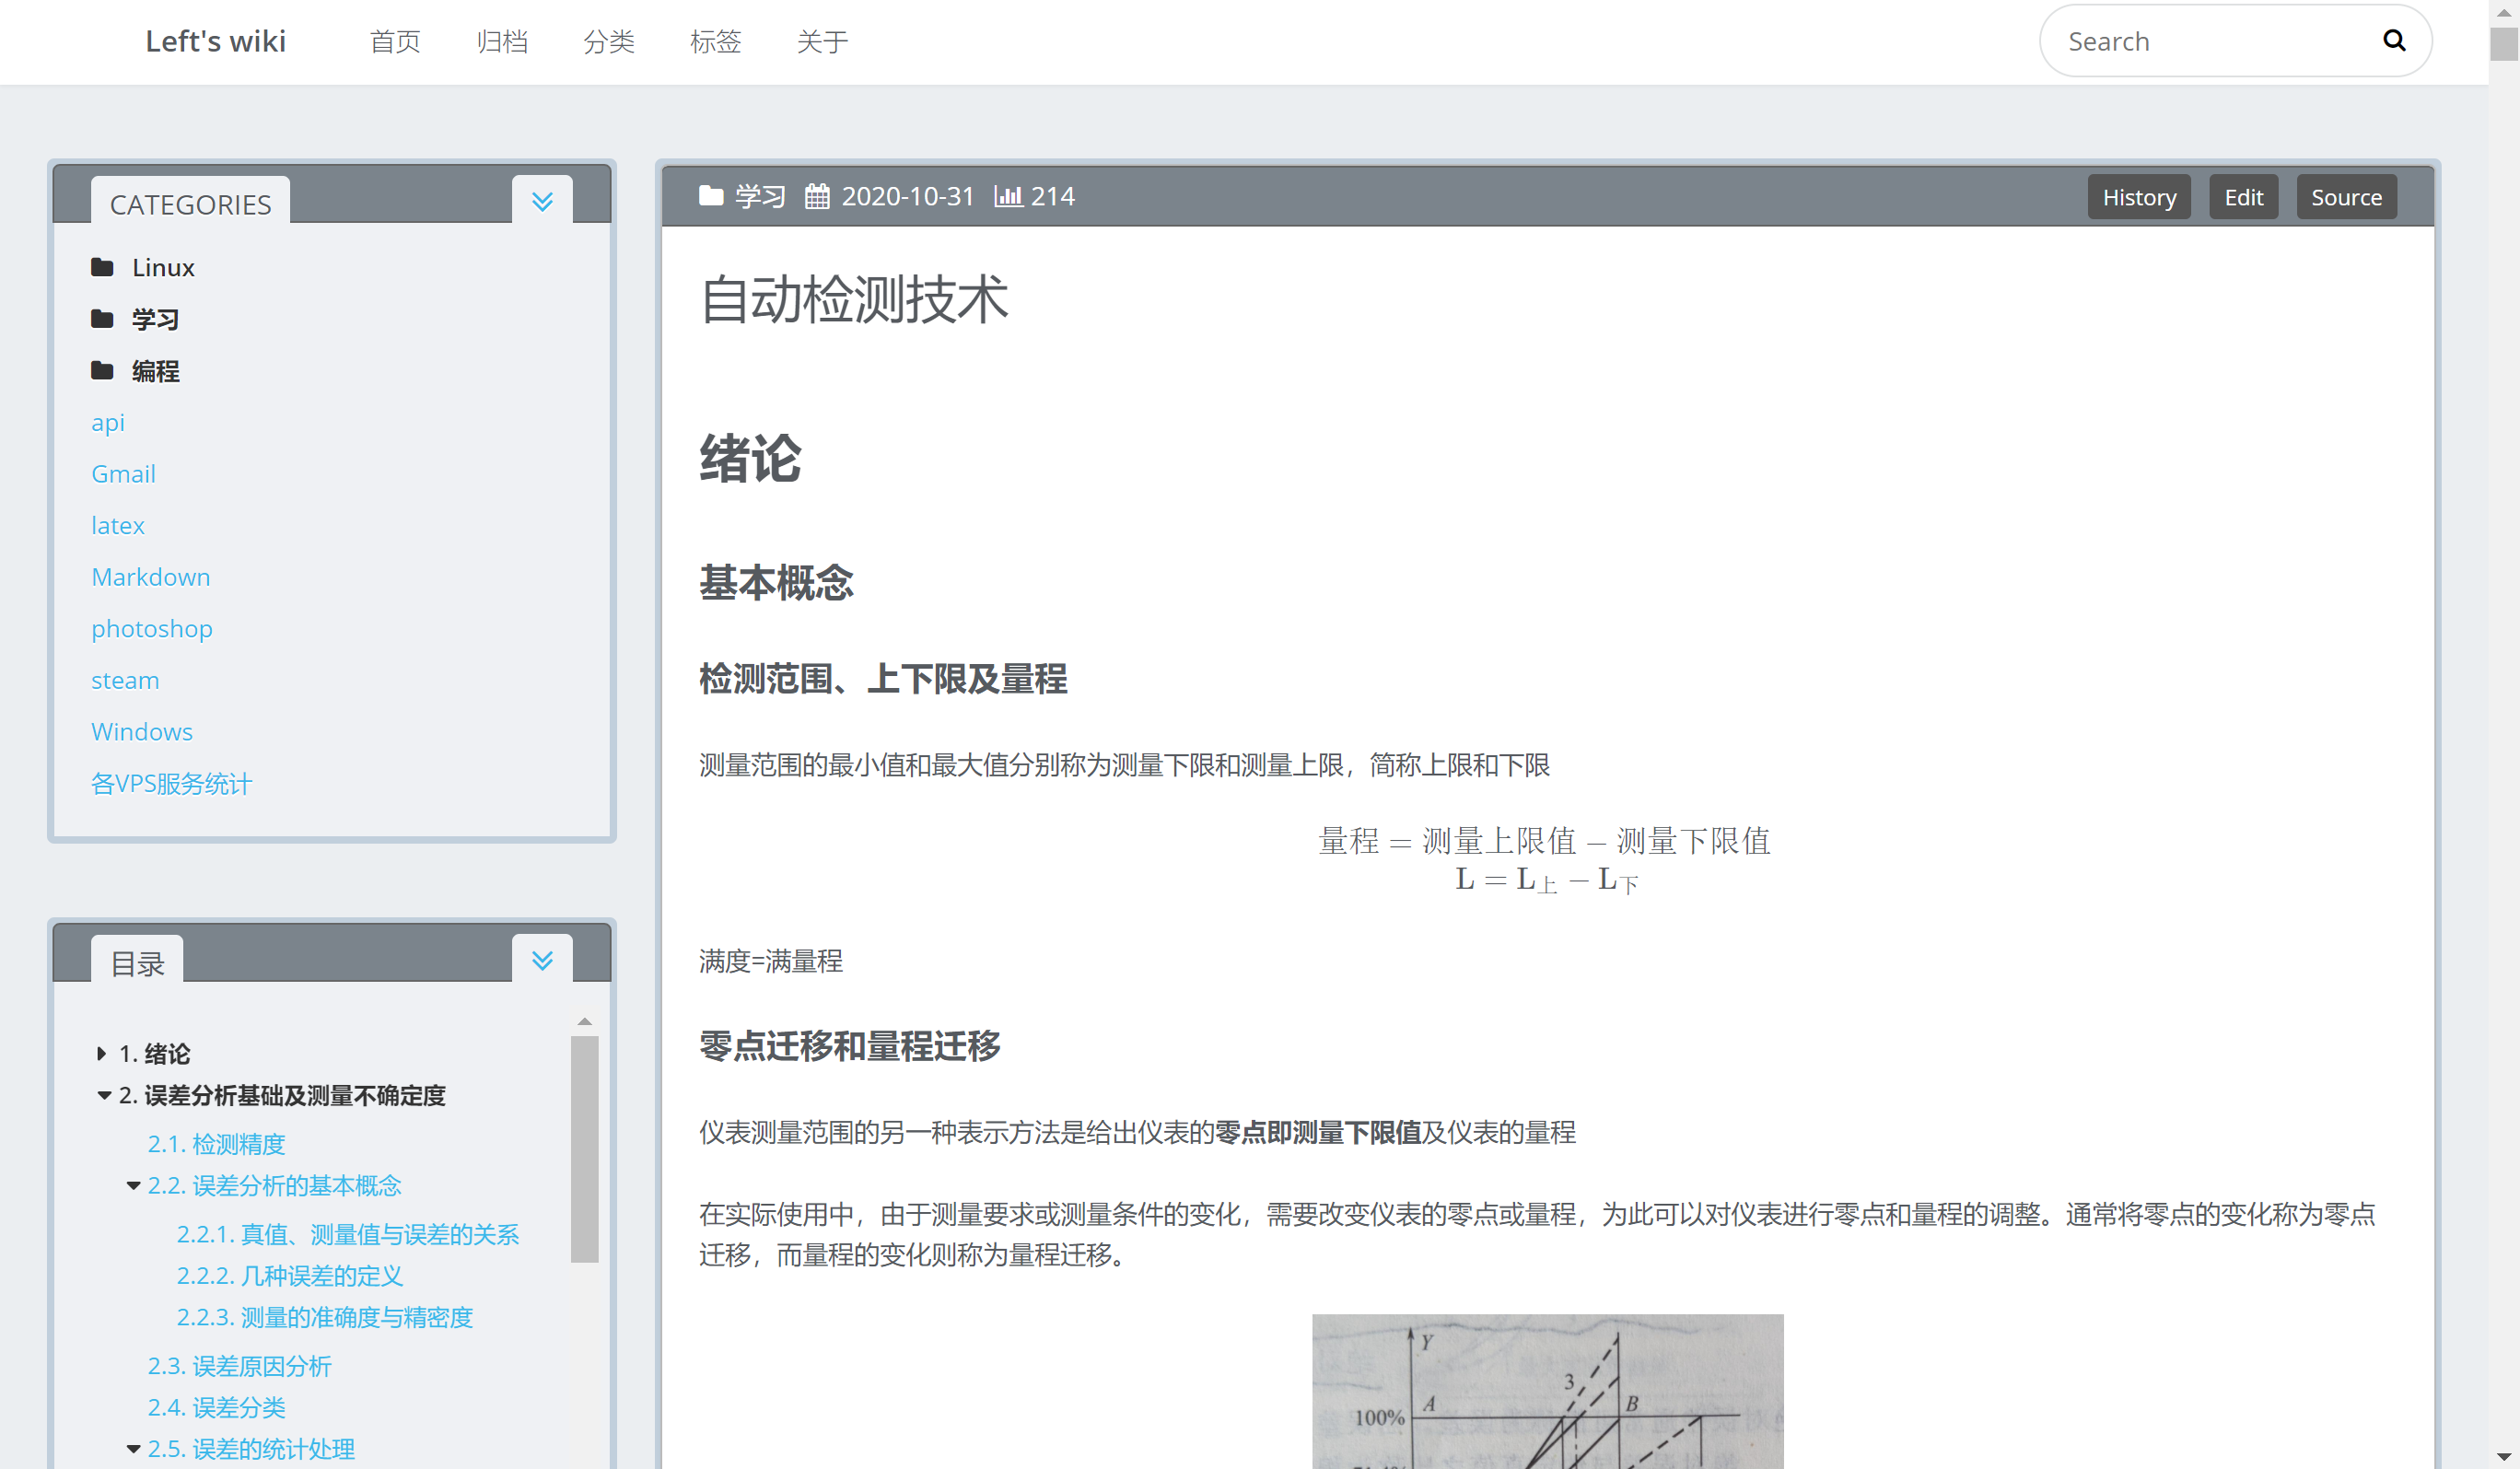
呈现效果非常完美,左侧多层目录,全局搜索也非常快
并且这个网站是实时渲染的,只要把修改好的文件上传到对应目录即可完成修改,完全不需要重启等等的操作。
同步软件我是用的是 Goodsync,具体可以看看这篇文章。
接下来我会讲讲怎么搭建这个网站,我所展示的功能并不是即装即用的,需要很多修改,我也踩了很多的坑。
以下安装基于Ubuntu18.04
安装Hexo
安装git-core
sudo apt-get install git-core
|
Hexo需要nodejs版本为12及以上
curl -sL https://deb.nodesource.com/setup_12.x  sudo -E bash -
sudo apt-get install -y nodejs
|
安装Hexo
npm install -g hexo-cli
mkdir /hexo
hexo init /hexo
cd /hexo
npm install
|
安装Wikitten主题
在hexo根目录执行
git clone https://github.com/zthxxx/hexo-theme-Wikitten.git themes/Wikitten

cp -rf themes/Wikitten/_source/* source/
cp -rf themes/Wikitten/_scaffolds/* scaffolds/

cp -f themes/Wikitten/_config.yml.example themes/Wikitten/_config.yml

npm i -S hexo-autonofollow hexo-directory-category hexo-generator-feed hexo-generator-json-content hexo-generator-sitemap
|
启用主题
修改/hexo/_config.yml
支持Katex
默认的mathjax渲染会有很大问题,在/hexo下执行
npm uninstall hexo-renderer-marked --save
npm install hexo-renderer-markdown-it-plus --save
npm install hexo-math --save
|
安装完后在/hexo/themes/Wikitten/_config.yml中按照如下修改:
将plugin中的mathjax改为false

末尾添加
math:
    enable: true
    specific: true
    engine: katex
|
由于这里将specific的值设为了true,所以在需要进行数学公式渲染的文章的font-matter中添加一条math: true,采用这种方法可以不影响不需要进行数学公式渲染的页面的加载速度。
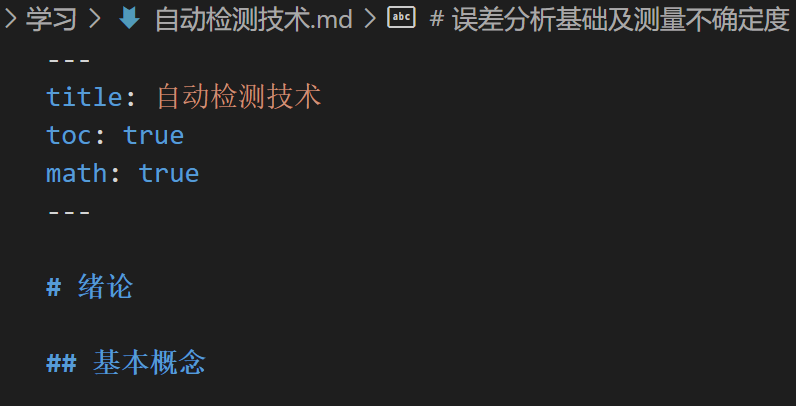
目录放在侧边栏
文档首页需要添加字段才能开启目录显示(如上图)
删除旧文件(目的:不在文章正文内显示TOC)
删除/hexo/themes/Wikitten/layout/common/article.ejs文件内关于toc的内容:
<% if (post.toc) { %>
       <div id="toc" class="toc-article">
       <strong class="toc-title"><%= __('article.catalogue') %></strong>
           <%- toc(post.content) %>
       </div>
   <% } %>
|
在/hexo/themes/Wikitten/layout/widget添加文件
粘贴如下内容
<% if (page.toc) { %>
<div class="widget-wrap" id='toc'>
<h3 class="widget-title">
<span><%= __('目录') %></span>
<a id='tocExpand' href="#">
<i class="fa fa-angle-double-<%- theme.customize.category_perExpand ? 'up' : 'down' %> fa-2x"></i>
</a>
</h3>
<%- toc(page.content, {list_number: true}) %>
</div>
<script>
var $itemHasChild = $("#toc .toc-item:has(> .toc-child)");
var $titleHasChild = $itemHasChild.children(".toc-link");
$itemHasChild.prepend("<i class='fa fa-caret-down'></i><i class='fa fa-caret-right'></i>");
var $opentoc = $(".toc-item > .fa-caret-down");
var $closetoc = $(".toc-item > .fa-caret-right");
$closetoc.addClass("hide").hide();
var clickIcon = function(){
$("#toc .toc-item > i").click(function(){
$(this).hide();
$(this).siblings(".toc-child").slideToggle(100);
$(this).toggleClass("hide");
$(this).siblings("i").toggleClass("hide");
if( $(this).siblings("i").hasClass("hide") ){
$(this).siblings("i").hide();
}else{
$(this).siblings("i").show();
}
})
}()
var clickTocTitle = function(){
var $subToc = $titleHasChild.next(".toc-child");
var $tocTitle = $("#tocExpand");
var iconAllExpandClass = 'fa-angle-double-down';
var iconAllPackClass = 'fa-angle-double-up';
if ($titleHasChild.length) {
$tocTitle.addClass("clickable");
$tocTitle.click(function(){
var icon = $(this).children('.fa');
if ($subToc.is(":hidden")) {
$subToc.show(100);
$closetoc.addClass("hide").hide();
$opentoc.removeClass("hide").show();
icon.removeClass(iconAllPackClass).addClass(iconAllExpandClass);
} else {
$subToc.hide(100);
$opentoc.addClass("hide").hide();
$closetoc.removeClass("hide").show();
icon.removeClass(iconAllExpandClass).addClass(iconAllPackClass);
}
})
}
}()
</script>
<% } %>
|
在侧边栏的样式文件(/hexo/themes/Wikitten/source/css/_partial/sidebar.styl)内添加toc插件的自定义样式(末尾添加):
#toc ol.toc li.toc-item i {
display: inline-block;
margin-left: -0.9em;
width: 0.9em;
color: #333;
font-weight: bold;
cursor: pointer;
}
#toc ol.toc li.toc-item i:hover {
color: #ff0000;
}
#toc ol.toc li.toc-item i.hide {
display: none;
}
#toc #tocExpand.clickable {
cursor: pointer;
}
#toc #tocExpand.clickable:hover {
color: #88acdb;
}
#toc #tocExpand.clickable:active {
color: #d3d3d3;
}
#toc {
font-size: 0.9em;
line-height: 1.8em;
float: none;
}
#toc ol.toc {
margin-left: 0;
padding: 1.2em;
padding-right: 0;
max-height: 380px;
overflow: auto;
}
#toc ol.toc li.toc-item {
list-style-type: none;
}
#toc ol.toc li.toc-item:hover {
background: none;
}
#toc ol.toc a.toc-link {
color: #333;
font-weight: bold;
}
#toc ol.toc a.toc-link:hover {
color: #88acdb;
text-decoration: none;
background: rgba(158,188,226,0.21);
}
#toc ol.toc ol.toc-child {
padding-left: 1.25em;
margin: 4px 0;
}
#toc ol.toc ol.toc-child a.toc-link {
color: #38b7ea;
font-weight:normal;
}
|
在主题的配置文件(/hexo/themes/Wikitten/_config.yml)添加该widget:
widgets:
- category
- toc
|
通过Systemctl启动网站
创建service文件
nano /etc/systemd/system/hexo.service
|
粘贴以下内容
[Unit]
Description=hexo
After=network.target

[Service]
Type=simple
ExecStart=/usr/bin/hexo server
Restart=always
User=root
Environment=NODE_ENV=production
WorkingDirectory=/hexo

[Install]
WantedBy=multi-user.target
|
启动
开机自启
配置https
nginx
apt-get install nginx
nano /etc/nginx/conf.d/hexo.conf
|
粘贴如下内容
server {
    listen       80;
    server_name  xxxxx.com;

location / {
    proxy_pass http://127.0.0.1:4000;
    }
}
|
apache2
启用模块
sudo a2enmod ssl
sudo a2enmod proxy
sudo a2enmod proxy_wstunnel
sudo a2enmod proxy_http
sudo a2enmod rewrite
sudo a2enmod headers
service apache2 restart
|
创建配置文件
nano /etc/apache2/sites-available/hexo.conf
|
粘贴如下内容
<VirtualHost *:80>
    ServerName xxxxxxx.com

    ServerAdmin webmaster@localhost
    DocumentRoot /var/www/
    ProxyPass "/" "http://127.0.0.1:4000/"


    ErrorLog ${APACHE_LOG_DIR}/error.log
    CustomLog ${APACHE_LOG_DIR}/access.log combined

</VirtualHost>
|
启用配置
cd /etc/apache2/sites-enabled
sudo ln -s ../sites-available/hexo.conf
sudo service apache2 restart
|
申请证书
wget https://dl.eff.org/certbot-auto
chmod a+x certbot-auto
sudo ./certbot-auto --apache
sudo ./certbot-auto --nginx
|
网站加密
如果你不希望你的笔记被别人看到则可以把它加密
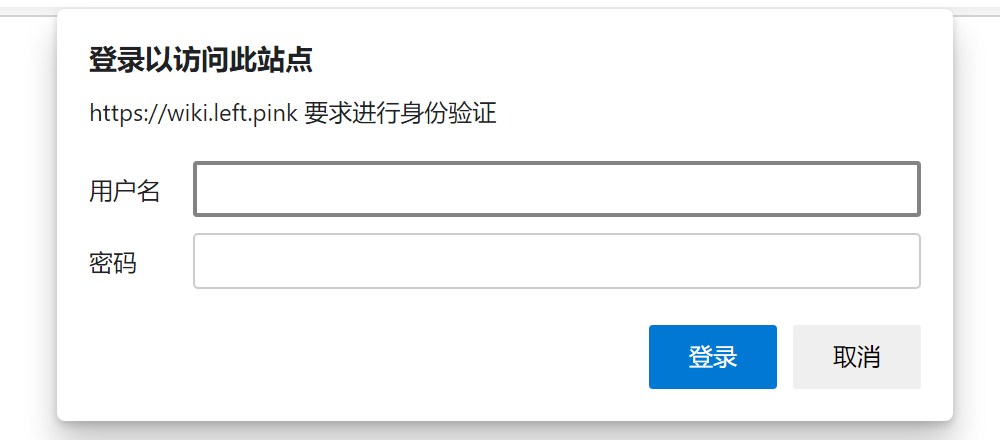
nginx
sudo apt-get install apache2-utils
|
添加用户
sudo htpasswd -c /etc/nginx/.htpasswd left
|
在上面的配置文件中添加
location / {
    proxy_pass http://127.0.0.1:4000;
    auth_basic "Restricted";
    auth_basic_user_file /etc/nginx/.htpasswd;
    }
|
重启生效
apache2
添加用户
sudo htpasswd -c /etc/apache2/.htpasswd left
|
配置文件中添加
<Proxy *>
        AuthType Basic
        AuthName "wiki"
        AuthUserFile "/etc/apache2/.htpasswd"
        Require valid-user
    </Proxy>
|
开始记笔记
每一篇文章的开头都要添加如下内容
---
title: 标题
toc: true
math: true
---
|
网站显示的文章名字是上面的标题而不是文件名字,toc是目录的显示,math是数学公式渲染。
文章存储在/hexo/source/_posts下,图片存储在/hexo/source/images,或者是可以使用图床,具体可以看看这篇文章
参考链接
评论